
Mastering Flower Photography Tips for Stunning Floral Shots
A flower can look breathtaking in person and strangely flat in a photo. The color is there, the petals are there, the light seems fine, yet the image lacks the feeling that made you stop in the first place.
That gap usually comes down to a few controllable choices: light, background, focus, composition, and timing. Flower photography rewards patience more than expensive gear. A phone can make a lovely close-up. A DSLR or mirrorless camera can give more control. Either way, the goal stays the same: show the shape, texture, color, and mood of the bloom with intention.
The best floral shots do not just document a flower. They guide the eye.

Start with light before you think about gear
Light decides whether a flower looks soft, harsh, delicate, dramatic, or dull. Before changing lenses or camera settings, look at where the light is coming from and how it touches the petals.
Bright midday sun is often the hardest light for flowers. It creates sharp shadows, blown-out highlights, and colors that can look too intense. Red, yellow, and white flowers are especially easy to overexpose in strong sun.
Early morning and late afternoon usually work better. The light sits lower, comes from the side, and gives petals more shape. Morning also brings calmer wind and, sometimes, dew.
Cloudy days are excellent for floral shots. Clouds act like a giant diffuser, spreading light evenly across the subject. This helps preserve color and detail, especially on pale blossoms.
Try these simple lighting setups:
Side light
Place the flower so light comes from the left or right. This shows texture and curves.
Backlight
Shoot toward the light with the flower between you and the sun. Thin petals can glow beautifully.
Open shade
Look for flowers shaded by a tree, wall, porch, or taller plant. The light stays soft but still bright enough for clean detail.
Window light
For cut flowers indoors, place the vase near a window and turn off overhead lights. Window light is easier to shape and often more flattering.
A small reflector can help if one side of the flower looks too dark. You do not need a professional one. A white card, foam board, or even a pale notebook can bounce light back onto the shadow side.
If the light feels too harsh, use your body, a diffuser, or a thin white cloth to soften it. The difference can be immediate. Petals that looked shiny and flat will show fine veins, gentle folds, and natural color.
Build cleaner compositions with fewer distractions
Flowers are busy subjects. Petals overlap, stems cross, leaves poke in from every angle, and garden beds can get messy fast. Strong composition helps turn all of that into a clear image.
Start by deciding what the photo is about. Is it the center of a sunflower, the curve of a tulip, water drops on a rose, or a cluster of wildflowers in a field? Once you know the subject, remove or reduce anything that pulls attention away from it.
That does not mean picking flowers or changing the scene in a harmful way. Often, a small shift in camera position solves the problem.
Move a few inches left or right. Crouch lower. Shoot upward. Step around the plant until the background supports the flower instead of fighting it.
Pay close attention to the background. A beautiful bloom can lose impact if a bright stick, fence rail, or patch of sky cuts through it. A darker background often makes lighter flowers stand out. A soft green background works well for many colors. A distant background creates blur more easily than one close behind the subject.

Use these composition choices to strengthen your frame:
Fill the frame
Leave breathing room
Use odd numbers
Look for repetition
Embrace negative space
Move close so petals, texture, and color become the whole story.
Give the flower space in the direction it leans or opens.
Groups of three or five blooms often feel balanced and natural.
Petals, stems, and rows of flowers can create rhythm.
A quiet area around the subject can make the image feel more elegant.
The rule of thirds can help, but do not follow it blindly. Place the flower off-center when it adds movement. Center it when symmetry is the point. A daisy, poppy, or lotus can look striking with the middle of the bloom placed right in the center of the frame.
For close-up work, watch your edges. Cut petals can look intentional if the framing is bold. They look accidental if a tiny slice disappears at the corner. Take one frame, check the edges, then adjust.
A clean composition often comes from subtraction. The fewer things competing for attention, the stronger the flower becomes.
Control focus and depth for sharper floral detail
Focus can make or break a flower image. With close subjects, depth of field becomes very thin. That means only a small part of the flower may appear sharp, especially if you use a wide aperture.
The key is choosing what needs to be sharp. For many flowers, that point is the center. For side views, it may be the front edge of a petal. For a flower with an insect, focus on the insect’s eye or head if visible. The viewer’s eye usually goes to the sharpest part of the frame first.
If you use a camera with manual controls, aperture matters:
Wide apertures like f/1.8, f/2.8, or f/4
These create strong background blur but can leave much of the flower soft.
Middle apertures like f/5.6 or f/8
These keep more of the bloom in focus while still giving some background separation.
Smaller apertures like f/11 or f/16
These increase depth of field but may require slower shutter speeds or higher ISO.
For flower photography, f/5.6 to f/8 is often a useful starting point. It gives enough detail for many blooms without making the background too sharp.
If you are using a phone, tap directly on the part of the flower you want sharp. Many phones also let you lower exposure by dragging down after tapping. This helps protect bright petals from losing detail.
Wind is another focus problem. A flower that moves only slightly can be out of focus by the time the shutter fires. On breezy days, raise your shutter speed. For still flowers, slower speeds may work. For moving stems, use faster speeds to freeze motion.
A tripod helps with careful compositions, but it is not always practical in a garden. If you shoot handheld, brace your elbows against your body, lean against a tree, or rest the camera on a stable surface. Take several frames. Tiny changes in movement can make one image much sharper than the others.
For close-ups, avoid getting so close that your camera cannot focus. Every lens and phone has a minimum focusing distance. If the image keeps hunting or looks soft, back up a little and crop later if needed.
Use color, texture, and mood with purpose
Flowers invite color, but color alone does not guarantee a strong photo. The best images use color with control.
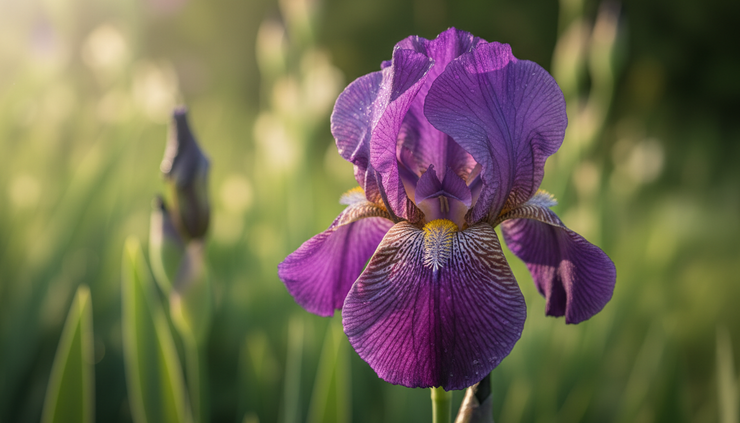
Start by noticing color relationships. A red flower against green leaves has natural contrast. Purple blossoms can look rich against yellow or pale green. White flowers often need gentle light and a darker background to keep their shape.
Be careful with saturation. Many cameras and phones boost flower colors automatically. This can make petals look artificial, especially reds and pinks. If editing, raise saturation slowly or use vibrance with restraint. Keep the color believable.
Texture brings floral images to life. Look for:
Fine veins in petals
Pollen on stamens
Curled petal edges
Dew or rain drops
Torn, fading, or drying petals
Tiny hairs on stems or leaves
Do not ignore imperfect flowers. A flawless bloom can be beautiful, but aging petals often tell a stronger visual story. A rose with curled edges, a sunflower with missing seeds, or a dried hydrangea can have more character than a perfect blossom.
Mood comes from the mix of light, color, background, and framing. A bright daisy photographed from above feels cheerful. A dark red rose with side light feels dramatic. A pale magnolia in fog feels quiet. Before pressing the shutter, decide what the image should feel like.
That choice affects every other decision.
If you want a soft, calm photo, use diffused light, muted backgrounds, and shallow depth of field. If you want a bold photo, choose stronger contrast, lower angles, and tighter framing. If you want a botanical look, keep the flower sharp and clean against a simple background.
Editing should support the mood rather than overpower it. Start with basic adjustments:
Correct the exposure so petals keep detail.
Adjust white balance so colors look natural.
Add contrast only if the image needs more shape.
Sharpen lightly, especially around the flower center.
Crop to remove distractions near the edges.
A good edit should feel invisible. The flower should look more like what you noticed, not like a filter took over.
Practice with simple setups anywhere
You do not need a famous garden to make strong flower images. A windowsill, public park, front yard, farmers market bouquet, or roadside patch of wildflowers can offer plenty to study.
The advantage of simple locations is control. With one potted orchid near a window, you can practice light direction, background choice, and focus without wind or changing weather. With a grocery-store bouquet, you can separate one stem and place it in a plain vase near a shaded window.
Here is a simple home setup:
Place one flower in a small vase near a window.
Put a plain board, wall, curtain, or dark cloth behind it.
Turn the flower slowly until the light shows its shape.
Move closer, then farther away.
Shoot from above, eye level, and below the bloom.
Try both vertical and horizontal frames.
Use a white card to brighten shadows.
This kind of practice builds the habits that matter outside. When you reach a garden, you will notice cleaner backgrounds faster. You will recognize good light sooner. You will waste less time fighting the scene and spend more time making choices.
If you photograph outdoors, respect the space. Stay on paths where required, avoid stepping into plant beds, and do not damage flowers for a shot. Many public gardens have rules about tripods, reflectors, or commercial photography, so check signs before setting up.

A personal project can also help. Choose one flower and photograph it in ten different ways. Or visit the same patch once a week and track how the blooms change. Repetition trains the eye. It also shows how light, weather, and growth stages affect the final image.
Try setting small goals instead of chasing one perfect frame:
Make one photo where the background is clean.
Make one photo where only the center is sharp.
Make one photo using backlight.
Make one photo that includes the whole plant.
Make one abstract photo focused on petal shapes.
Review the results after a break. The strongest image is not always the one that looked best on the camera screen. Look for clean focus, pleasing light, and a clear subject. Notice what keeps showing up in your favorite shots, then repeat it with intention.

The path to better floral images is simple, even if it takes practice. Start with soft light. Clean up the background. Put focus where it matters. Use color and texture with care. Then keep experimenting with angle, distance, and mood.
A flower does not need to be rare to make a memorable photograph. It only needs your attention long enough for you to see what makes it worth framing.


Comments